
Priya Nakamura, Staff Writer.
You know the moment. Day two of a fresh manicure and there is already a hairline chip at the tip of your thumbnail, right where your keys live. The bottle promised ten days. Your bathroom drawer holds a dozen half-used candidates from past attempts, all abandoned for the same reason. What you actually want to know, the question you would type into a search bar at 11 p.m., is simpler than any of the marketing copy: how do you tell, standing in the aisle or scrolling a product page, whether a polish will actually hold up? One useful fact to start: durability has less to do with the brand on the label and more to do with how thin your coats are and how well you prepared the nail before the first stroke touched it. Everything else is refinement.
- Thin coats outlast thick ones. A polish film that is too heavy stays flexible for days, then cracks under normal flexing of the nail plate.
- Prep matters more than formula. Oil, moisture and old cuticle debris on the nail surface undo even a well-engineered polish before it has a chance to bond.
- Marketing wear-time claims are tested under conditions you will not replicate at home. Real-world chip resistance depends on your hand use, not the number printed on the box.
Reading The Bottle Like A Chemist Would

Every long-wear polish is built from three working parts: film formers, plasticizers, and pigment carried in a solvent that evaporates as it dries. The film former is the ingredient doing the actual holding, usually a nitrocellulose or a related polymer. Think of it the way you would think of paint drying on a fence rail: the solvent leaves, the resin left behind hardens into a skin, and that skin is only as durable as its recipe and its thickness.
Plasticizers keep that skin from becoming brittle. Too little, and the polish cracks like old varnish. Too much, and it stays soft and dents under a fingernail’s daily knocks. A 2019 study in the International Journal of Cosmetic Science found that polish films lose flexibility once they exceed a certain thickness, which is one reason two thin coats consistently outperform one thick one in wear testing.
None of this shows up on the label in plain language. What you can look for instead is texture during application: a polish that drags, pools, or self-levels unevenly is telling you something about its resin balance before you even get to day two.
The Prep Step Nobody Photographs
Manicure tutorials linger on colour and finish. They rarely linger on the thirty seconds before the brush ever touches the nail, and that thirty seconds decides more than any top coat will.
Natural nail plates carry a thin layer of oil and moisture. Polish cannot bond to that layer any better than tape bonds to a greasy countertop. Wiping each nail with an alcohol-based prep pad, not just a swipe of remover, strips that residue and gives the film former something to grip.
Buffing matters too, but lightly. Over-buffing thins the nail plate itself and can leave it more flexible, which paradoxically makes polish crack sooner because the surface underneath is moving more than the film on top can tolerate. A light matte pass, just enough to remove shine, is the balance most nail technicians describe in trade literature.
Self-test: after cleaning your nails, press a piece of tape gently onto one nail and peel it off. If it lifts oily residue, your prep is not finished yet.
Why Thin Coats Beat Thick Ones
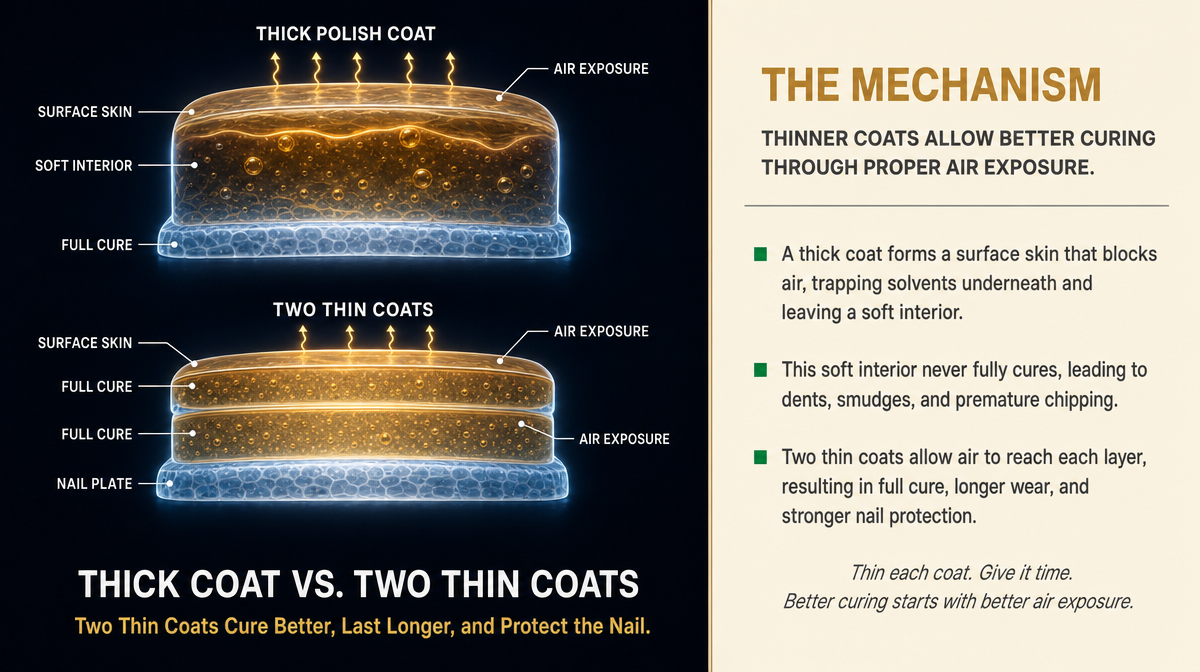
This is the single habit most home manicures get wrong, and it is almost always a reaction to a polish that seems to need three coats for full colour. The instinct is to load the brush and go heavy. The result is a film that takes longer to cure all the way through, not just on the surface.
A polish can look and feel dry within minutes while the layer underneath is still soft. Layer flooring is a useful comparison here: laminate boards need time to settle and bond fully before you can walk on them without leaving marks, even though the surface looks finished right away. Nail polish behaves the same way. The top skins over quickly because it is exposed to air, but the middle of a thick coat can stay pliable for hours, which is exactly when a bump against a car door or a zipper creates a dent that never fully heals.
Two thin coats, each given two to three minutes to set before the next, dry more evenly through their whole depth and resist that kind of early damage far better than one thick pass.
Gel-effect Versus True Gel: What The Words Actually Mean
Bottles marketed as gel-effect, gel-finish, or gel-inspired are, chemically, still air-dry lacquers. They may include a resin blend engineered for higher shine and a plumper film, but they cure the same way any traditional polish does: through solvent evaporation, not under a UV or LED lamp.
True gel polish is a different chemistry altogether. It contains photoinitiators that only harden when exposed to specific light wavelengths, which is why it needs a lamp and why it tends to outlast lacquer by a wide margin on most hands.
The confusion is not accidental. Gel-effect language sells the idea of gel durability without gel equipment, and for some wearers the shine alone justifies the price. But if long wear is your actual goal rather than finish quality, the presence of the word gel on a lacquer bottle is not evidence of anything beyond marketing language. Check the application instructions: if there is no mention of a lamp, you are looking at conventional polish chemistry regardless of what the front label promises.
The Tip-wear Test: Judging Durability In The First 48 Hours
Most chipping does not start in the middle of the nail. It starts at the free edge, the exposed tip that takes direct contact with keyboards, zippers, and car doors dozens of times a day. This is where a polish’s real durability shows itself first, usually within a day or two.
A reliable habit borrowed from manicurists: cap the free edge on every coat. That means dragging the brush over the very tip of the nail, sealing the edge the same way you would seal the end of a rolled hem so it does not fray. Skipping this step is the single most common reason a polish that tests well on the back of the hand still chips within a day on the fingers that actually work.
Check your own nails at the 48-hour mark, not the seven-day mark most bottles advertise. If the tips are already lifting by then, the issue is very often application technique rather than the formula itself, and no amount of top coat will fix an uncapped edge after the fact.
Where Cheap And Expensive Shortcuts Show Up The Same Way
Price is a weak predictor of wear time, and it is worth saying plainly: a modestly priced polish with a well-balanced film former can outlast a costly one with a poorly matched plasticizer. What price more reliably buys is pigment load, brush quality, and finish consistency, not durability on its own.
Where formulas genuinely cut corners is in solvent quality and resin purity, both of which affect how evenly a polish self-levels and how much it yellows or dulls with sun exposure over weeks. These are real, measurable differences, not just brand positioning. A rougher solvent blend can leave visible brush strokes that a finer one would not, and that texture issue often gets blamed on application skill when it is closer to formulation.
The honest test is comparative, not absolute: apply two coats of two different polishes on adjacent nails under the same conditions and watch how each behaves over the following week under identical daily use.
Removal Habits That Undo Weeks Of Good Work
How you take polish off affects how your nails handle the next manicure, and most damage at this stage is preventable. Peeling or picking at chipped polish pulls layers off the nail plate itself, not just the colour, leaving a surface that is rougher and more porous for whatever goes on next.
An acetone soak, using a cotton pad held in place for roughly ten minutes rather than aggressive scrubbing, lifts the film without abrading the nail underneath. The Canadian Dermatology Association’s general public guidance on nail care echoes this point: gentle, patient removal preserves the nail plate better than force does, and repeated harsh removal is one of the more common causes of nails that seem permanently thin or brittle.
A short rest between manicures, even just a few days with a nourishing oil applied to the cuticle area, gives the nail plate a chance to rehydrate. Nails that go straight from removal into a fresh base coat, week after week, tend to show more of the very brittleness that gets blamed on polish quality rather than removal habits.
What The Wear-time Number On The Box Actually Measures
Numbers like “up to 10 days” come from controlled lab conditions: a fixed number of coats, applied by a trained technician, on panels of test subjects instructed to avoid activities known to cause chipping. That is a legitimate testing method, and outlets like Protégez-Vous use similarly controlled comparative testing to rate durability claims across consumer products. But it is not your Tuesday.
Dishwashing without gloves, gripping a yoga mat, or typing eight hours a day are all variables no wear-time claim accounts for. Treat the number on the box as a ceiling under ideal conditions, not a floor you should expect to reach.
A more useful mental model, one that beauty editors at outlets like ELLE Canada and The Kit have pointed to in coverage of long-wear formulas, is to judge a polish by how it fails rather than how long it lasts. Does it chip cleanly at the tip, which is manageable with a quick touch-up, or does it peel in sheets from the middle, which usually means starting over.
Key Takeaways
Long-wear polish performance comes down to a short list of controllable habits rather than any single miracle formula. Prep the nail properly, apply thin coats, cap the free edge, and judge results honestly at the 48-hour mark rather than trusting the number on the box. Removal technique protects the next manicure as much as application protects this one.
A Quick Checklist Before Your Next Manicure
- Clean each nail with an alcohol-based prep pad, not just remover
- Lightly buff to remove shine without thinning the nail plate
- Apply two thin coats rather than one thick one, letting each set for two to three minutes
- Cap the free edge on every coat
- Check wear at 48 hours, not seven days
- Remove with a patient acetone soak, never by peeling
- Rest the nail plate for a few days between manicures when possible
This article is intended for general information and does not replace advice from a qualified professional.
Individual results vary depending on application technique, nail condition and daily activity.